Classification Mapping
The Classifications Module allows you to standardize EDC and third-party study data with the Veeva Clinical Classification Library (VCCL). In the Classifications module, you can map source study data to standardized concepts in a structured workspace that includes tabs for Form Mapping, Item Mapping, and Value Mapping. Classification helps to establish a uniform clinical context across datasets so that study teams can leverage valuable new and upcoming DQS to streamline clinical data review.
After mapping in the Classifications module, you can use the QuickStart AI option to generate listings based on what you’ve mapped.
Accessing Classification
You can navigate to the Classification page from the Navigation Drawer after you select your Study, or the Study menu on the Studies page.
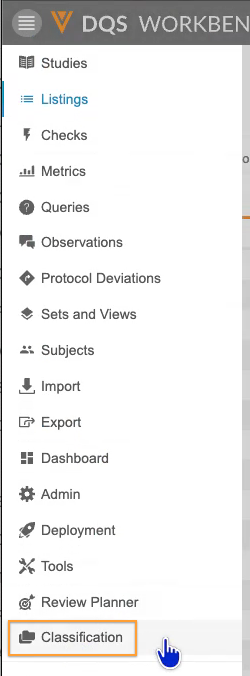
Navigating Classification
In the Classification module, you can map forms to domains, items to variables, and values to codelists in the Form Mapping, Item Mapping, and Value Mapping tabs.
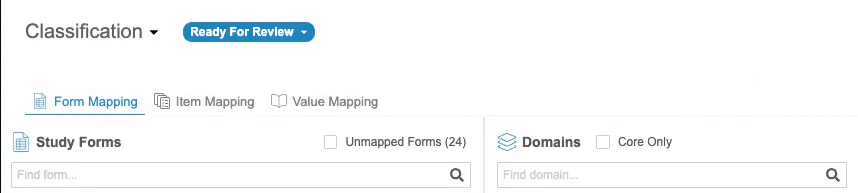
Form Mapping
In the Form Mapping tab, you can drag and drop from left to right to connect study-specific source forms on the left to VCCL target domains on the right. You can use the search and filter controls to focus on unmapped forms or core domains. To display all available forms on the left, make sure that there are no domains selected on the right.
To map a form to a domain:
- Select an unmapped form from the left panel.
-
Drag and drop the form into the appropriate domain in the left panel or select the Map option.
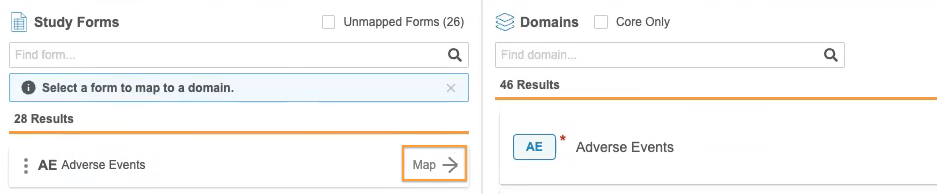
- You can map multiple forms to a domain. Mappings are saved automatically.
Critical Data Classification
Users with the Manage Classification permission can assign risk tiers to study items in the Classifications module during study setup in order to prioritize certain data points for review. Classifications uses the following three assignable criticality levels:
- Tier 1 (Essential/High Priority)
- Tier 2 (Important/Medium Priority)
- Tier 3 (Supportive/Low Priority)
Items with no assigned tier default to Routine (Unset/Null). Criticality tiers are assigned to individual items and scoped per form so that the same item definition collected on different forms can carry independent risk tiers.
Item Mapping
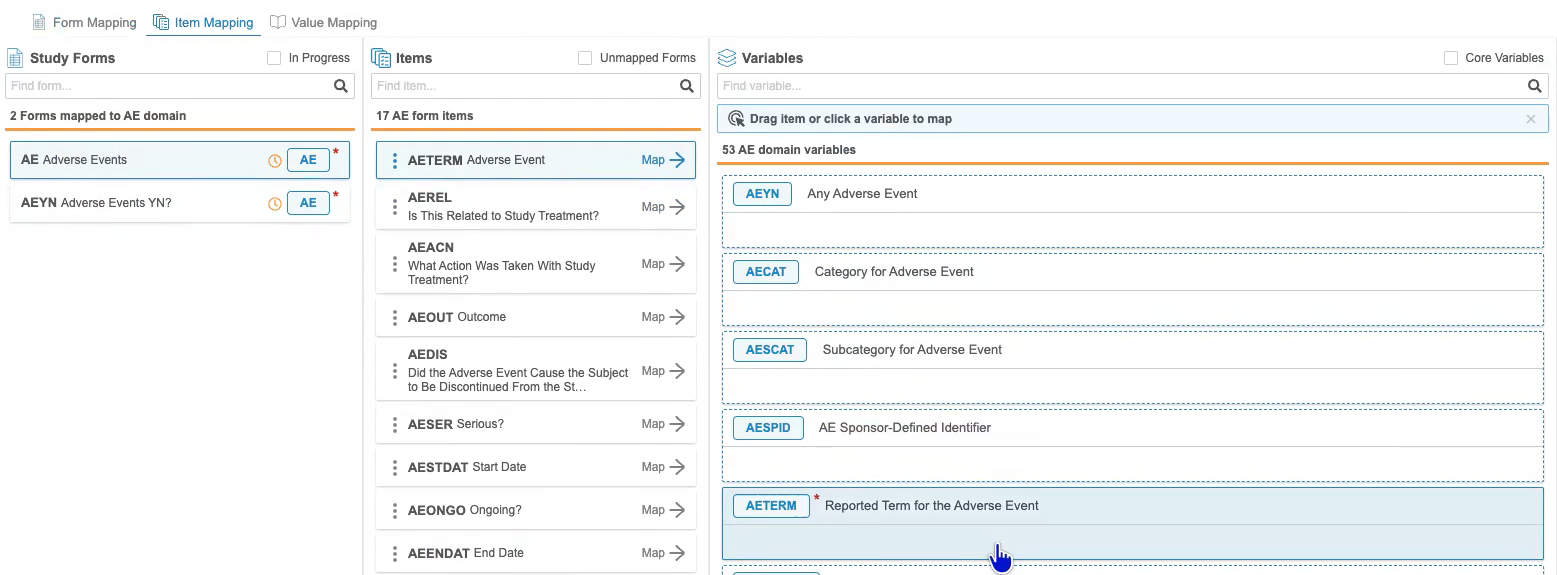
In the Item Mapping tab, you can connect mapped study form items to VCCL variables one form at a time.
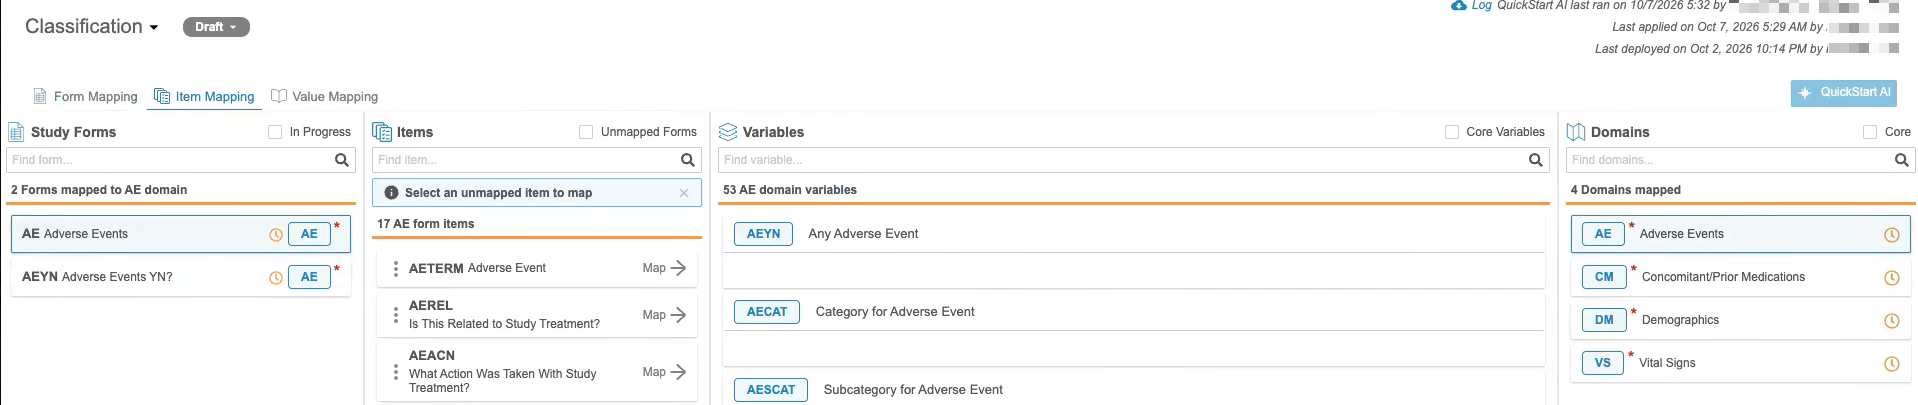
Only forms and domains that have already been mapped in the Form Mapping tab will display in the Study Forms and Domains columns.
To map an item to a variable:
- Select a form from the Study Forms column.
- Select the item you’d like to map from the Items column.
-
Drag and drop the item into the appropriate variable panel in the Variables column. You can also select the Map option after clicking on the desired variable instead of dragging and dropping. You can map multiple items to a variable.
-
Optional: If you’d like to only map core variables, check the Core Variables checkbox in the top right corner of the Variables column.

- Optional: If you’d like to move directly to value mapping at this point, you can select the Value Mapping link that appears in the mapped variable cell.

Tall Transform
When mapping an item to a variable in a findings group - a group that includes a test, a result, and a unit - where each result is in a different column, you’ll be prompted to switch to Tall Transform.
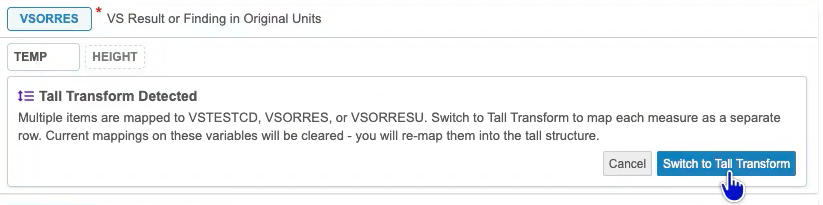
Tall Transform creates a table-like structure in the variable cell so that you can further organize your variable data.
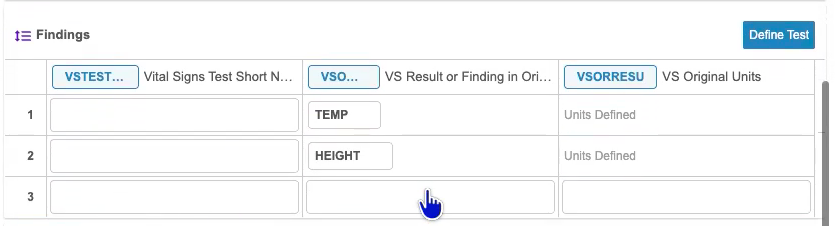
Once you’ve finished mapping your items to the Tall Transform structure, you can map codelists to controlled terms by clicking on the Define Test button.
Wide Transform
When mapping multiple items to the same variable, you’ll be prompted to switch to Wide Transform.
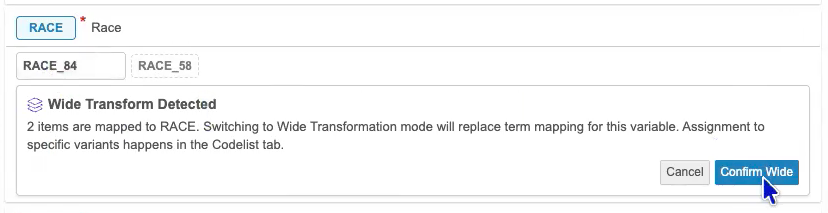
Wide Transform creates a bucket in the variable cell so that all items that are mapped to that variable will display in the same cell.

Value Mapping
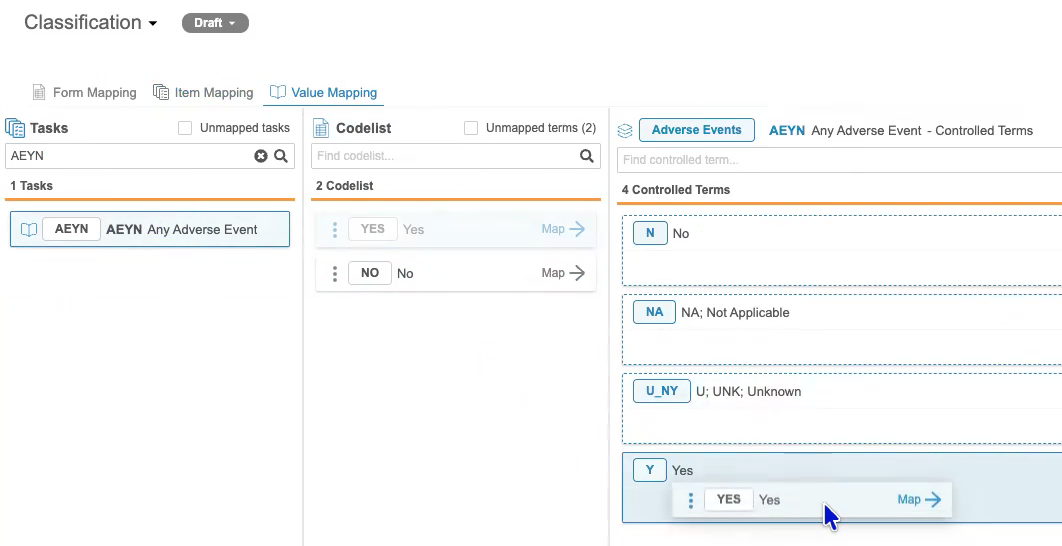
In the Value Mapping tab, you can map items to codelists. When you open the Value Mapping tab, you’ll see a list of items to map in the Tasks column. These are items that have already been mapped to variables in the Item Mapping tab.
To map an item to a codelist:
- Select an item from the Tasks column. The Codelist column will display codelist values, wide-transform items, or findings groups that need to be assigned and the Controlled Terms column will display the corresponding VCCL controlled terms when an item is selected.
- Drag and drop the item into the appropriate codelist panel.
- Drag and drop the codelist into the appropriate controlled terms panel or click Map. You can choose to display only unmapped tasks or terms in the Tasks and Codelist columns by selecting the Unmapped Tasks or Unmapped Terms checkbox.
Lifecycle Status & Deployment
You can monitor the status of your classifications at the top of the page. These statuses help to prevent unverified study configurations from impacting production workflows and allow you to deploy to production.
Draft
When actively mapping, your classifications will be in the Draft status. You can manually change your status by clicking on the status menu and selecting a status option. Your classifications will automatically return to the Draft status any time you make a change.
Ready for Review
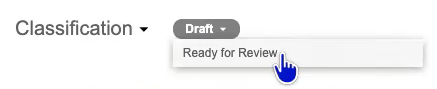
When you’ve finished mapping, you must manually move the status to Ready for Review by clicking on the current status and selecting Ready for Review. This action applies your changes to the test environment, which allows you to see criticality tiers in listings and the review planner. Once in the Ready for Review status, you can utilize QuickStart AI.
Ready for Approval
This status indicates that changes have been reviewed and your mappings are ready to be approved.
Approved
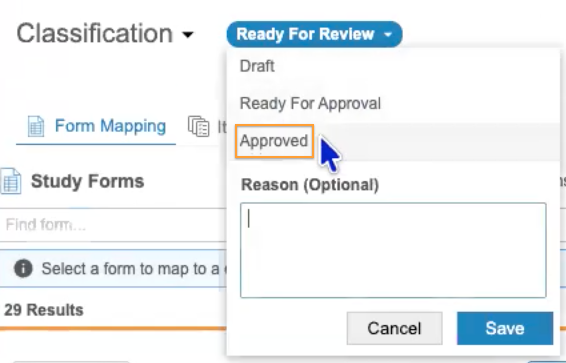
You can approve your changes and change your status to Approved by selecting Approved from the status dropdown menu and clicking Save.
Deploy
You can deploy your changes to production by selecting Deploy from the status dropdown menu and clicking Save.
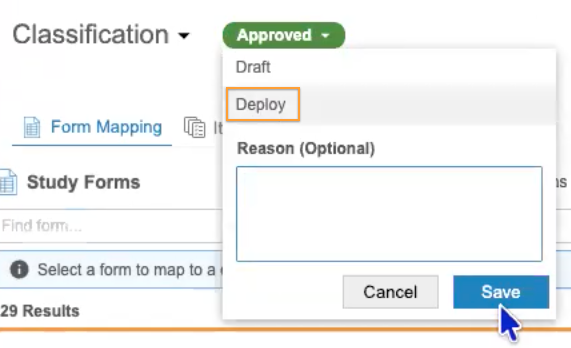
Your changes have been successfully deployed.
All actions are captured in the Classifications Approval Log, which you can download by clicking on the down arrow next to Classification.
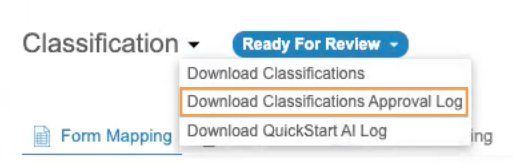
QuickStart AI
The QuickStart AI button in the Classifications module generates data cleaning listings from built-in templates directly in the TST environment. When you’ve finished mapping and set your lifecycle status to Ready for Review, the QuickStart AI button will become available to select.
To utilize QuickStart AI:
-
Select the QuickStart AI button.

-
The system will display a table detailing which listings can be generated based on your classification changes. Anything listed as “Not Mapped” in the Mapping Feedback column will not be generated in the listing. Potential listings marked with “Incomplete Mapping” include required components that have not been mapped yet. If the Mapping Feedback column is blank, then there are no pending mapping tasks.

- Select which listings to generate by checking the checkbox next to each desired listing. Listings that contain components that were recently mapped will be automatically selected.
- Click Save.
-
QuickStart AI will begin generating your listing(s). You can download a QuickStart AI Log by clicking on the down arrow next to Classification.
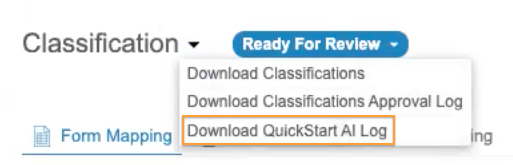
-
Access your listings by navigating to the Listings page from the Navigation Drawer then selecting the QuickStart AI tab. QuickStart AI listings only exist in the test environment, as their intended use is to function as a template.
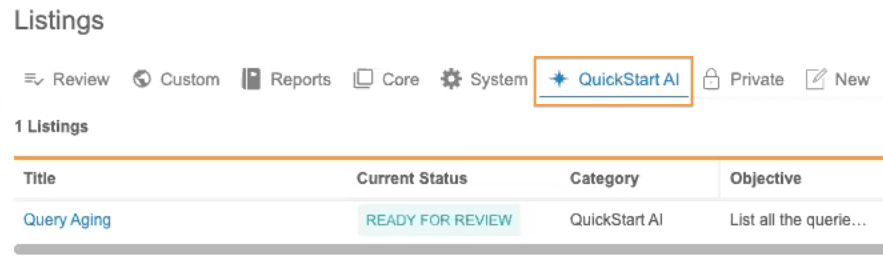
- Click on the title of the listing to open it.
The generated listing functions as a template which you can use to clone as a listing, check, etc. and perform other actions by clicking on the arrow next to the name of the listing and hovering over the Clone option.
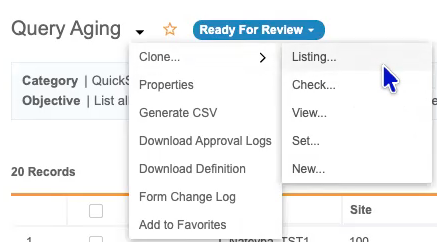
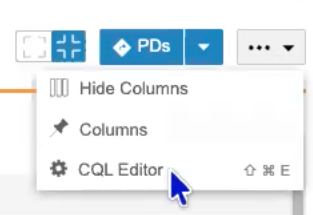
You can also review the CQL and edit columns by clicking on the Actions () menu when viewing the listing.
Classification AI Agent
The Classification AI Agent gives you the ability to initiate AI-driven form and item mapping on demand, while ensuring that previously approved classifications are never overwritten.
When you select the Classify AI button in the Classification module, the Classification AI Agent is triggered and executes a Form Mapping Action followed by an Item Mapping Action in sequence, meaning that once a form is mapped, the items on that form are subsequently classified. Upon completion, AI recommendations display for Forms and Items in the Classification UI and must be manually approved before they are permanently saved in DQS.